The timing gear, also known as the crankshaft pulley or harmonic balancer, plays a crucial role in synchronizing the engine’s valves and pistons. Removing the timing gear is often necessary for engine maintenance, repair, or replacement of the timing belt or chain. This guide provides a detailed step-by-step process for safely and effectively removing a timing gear from a crankshaft, ensuring that you can proceed with your engine work without complications.
Understanding the Timing Gear
Before diving into the removal process, it’s important to understand the timing gear’s function and its relationship with the crankshaft. The timing gear is typically driven by the engine’s crankshaft and is responsible for turning the camshaft, which in turn opens and closes the engine’s valves. The timing gear is usually secured to the crankshaft with bolts and may be part of a larger assembly that includes the harmonic balancer.
Preparing for the Task
Before you begin, ensure you have the following:
- Safety Gear: Safety glasses, gloves, and ear protection.
- Tools: Socket set, ratchet, breaker bar, torque wrench, engine hoist or jack, wheel chocks.
- Lubricant: A penetrating oil or lubricant to help loosen tight bolts.
- Replacement Parts: New bolts, gaskets, or seals if necessary.
Safety Precautions
- Park the Vehicle: Ensure the vehicle is parked on a level surface and the parking brake is engaged.
- Lift the Vehicle: If the engine is accessible from below, use a jack and wheel chocks to lift the vehicle and secure it safely.
- Disconnect the Battery: For added safety, disconnect the battery negative terminal.
- Protect Yourself: Wear safety glasses, gloves, and ear protection.
Step-by-Step Guide
Step 1: Access the Timing Gear
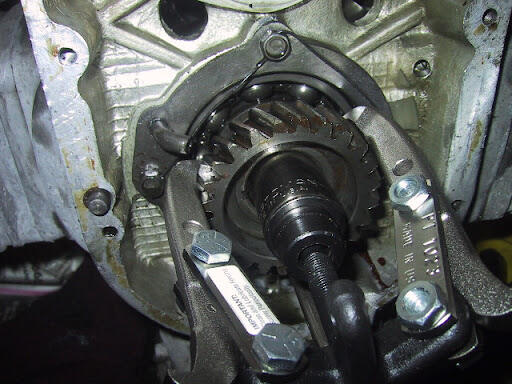
- Identify the Timing Gear: The timing gear is usually located on the front of the engine, attached to the crankshaft.
- Remove Engine Cover: If there is an engine cover or timing cover, remove it to gain access to the timing gear.
Step 2: Disconnect the Drive Belt or Chain
-
Belt-Driven Systems:
- Locate the tensioner and release it to relieve tension on the drive belt.
- Carefully slide the belt off the timing gear and the camshaft sprocket.
-
Chain-Driven Systems:
- Use a chain tool to disconnect the chain from the timing gear and camshaft sprocket.
Step 3: Loosen the Timing Gear Bolts
- Locate the Bolts: The bolts securing the timing gear to the crankshaft are typically located on the sides or top of the gear.
- Apply Penetrating Oil: If the bolts are tight, apply a penetrating oil to help loosen them.
- Loosen the Bolts: Use a socket and ratchet to loosen the bolts. If they are particularly tight, a breaker bar may be necessary.
Step 4: Remove the Timing Gear
- Support the Timing Gear: If the timing gear is heavy, support it with a jack or a block of wood to prevent it from falling.
- Remove the Bolts: Once the bolts are loose, carefully remove them and set them aside.
- Slide the Timing Gear Off: With the bolts removed, the timing gear should slide off the crankshaft. If it’s stuck, gently tap it with a hammer and punch to loosen it.
Step 5: Inspect the Timing Gear and Crankshaft
- Check for Damage: Inspect the timing gear and crankshaft for any signs of wear, damage, or misalignment.
- Record the Position: If the timing marks are visible, note their position for reassembly.
Step 6: Prepare for Reassembly
- Clean the Area: Clean the area around the crankshaft and timing gear to remove any debris or old lubricant.
- Prepare New Gaskets or Seals: If necessary, replace any gaskets or seals before reassembly.
Reassembly Tips
- Reinstall the Timing Gear: Align the timing gear with the crankshaft and secure it with the bolts.
- Torque the Bolts: Use a torque wrench to torque the bolts to the manufacturer’s specifications.
- Reconnect the Drive Belt or Chain: Reinstall the drive belt or chain and tension it properly.
- Replace the Timing Cover: If removed, replace the timing cover and secure it in place.
Conclusion
Removing a timing gear from a crankshaft is a critical step in engine maintenance and repair. By following this detailed guide, you can ensure that the process is completed safely and effectively. Always refer to the vehicle’s service manual for specific instructions and torque specifications. For a range of tools and accessories that can aid in your engine work, visit www.htlhongtu.com for professional-grade products designed to make your automotive repair tasks easier and safer.